Monday, February 28, 2011

I might just be the luckiest girl in the world...

Wow. Can I just say it again W-O-W. I know I am not dreaming because
 I am actually able to type right now. 

Let me start by saying this- just when you think you're down, the universe really does have a way of pulling you right back up.  It was a tough weekend and I was looking forward to starting a fresh new week.  I scheduled time for projects, have the blog planned out etc. Got myself organized!  I and many other bloggers who are moms have very little time to create although sometimes it looks like we do. I now I have something that will definitely make it all a little easier! 


I  won a Silhouette SD from The DIY Show Off! I actually started jumping up and down when I found out. No one was home ( but the dogs), so I just kept jumping and they started jumping too.  It's a funky electronic cutting tool that cuts fabric, card stock and vinyl. And best of all... freezer paper! Lots of tutorial ideas starting to brew here!  

A BIG Thank you to Roeshel at The DIY Show Off. If you haven't visited her blog you must. She has awesome tutorials, linky parties and a tour of her beautiful home. Fantastic spot for ideas and inspiration. 
Head on over to her blog and become a fan!


The DIY Show Off

Sweet Makes: Sweet Stego Hoodie! + Giveaway!

 Happy Monday everyone! 
As I've mentioned before, I am quite tired of buying boring boy clothes. Inspired by Dana over at Made  I have decided to make some clothes for Giraffe, which I will of course be sharing! Just because he's a boy doesn't mean he has to wear navy blue every day. Orange, turquoise, red etc, now those are colors for clothes! 

On to the tutorial.... 


Are you excited yet? Yes your boy ( or girl!) can have a Stego hoodie just like Giraffe's. I made it for his dinosaur themed birthday party. Download and print the pattern below for the applique and stego spikes...

Stego Sweatshirt Pattern


You'll Need: 
1/2 a yard of fun fabric 
Hoodie 
Rotary Cutter or Scissors 
Heat n'Bond 
Cotton poly fill 
Sewing stuffs ( thread, sewing machine or serger) 


1) Start by selecting your funky fabric. I found this shirt at the thrift store and had to have it. 


2) Grab your hoodie and lay it out flat on your cutting surface. Use a rotary cutter or scissors to splice along the hood. Try to cut straight, as you can tell, I didn't. Not to worry you'll be resewing it again anyway. You could also continue cutting all the way down the back of the hoodie and put in more spikes like a real Stegosaurs. I may try that at somepoint. 


3) Cut out the pattern pieces. After you determine how many spikes you want trace on to fabric and cut them out. Place pieces right sides together then sew around the edges using a 3/4'' seam. {My apologies for no photos of this process!} Turn them right side out and press. Stuff with cotton fill and topstich around the edges. 

4) Pin your stego spikes into your hood and zigzag stich all the way around twice for stability. Or serge if you own a serger. 

5) Turn right side out, ta-da! 


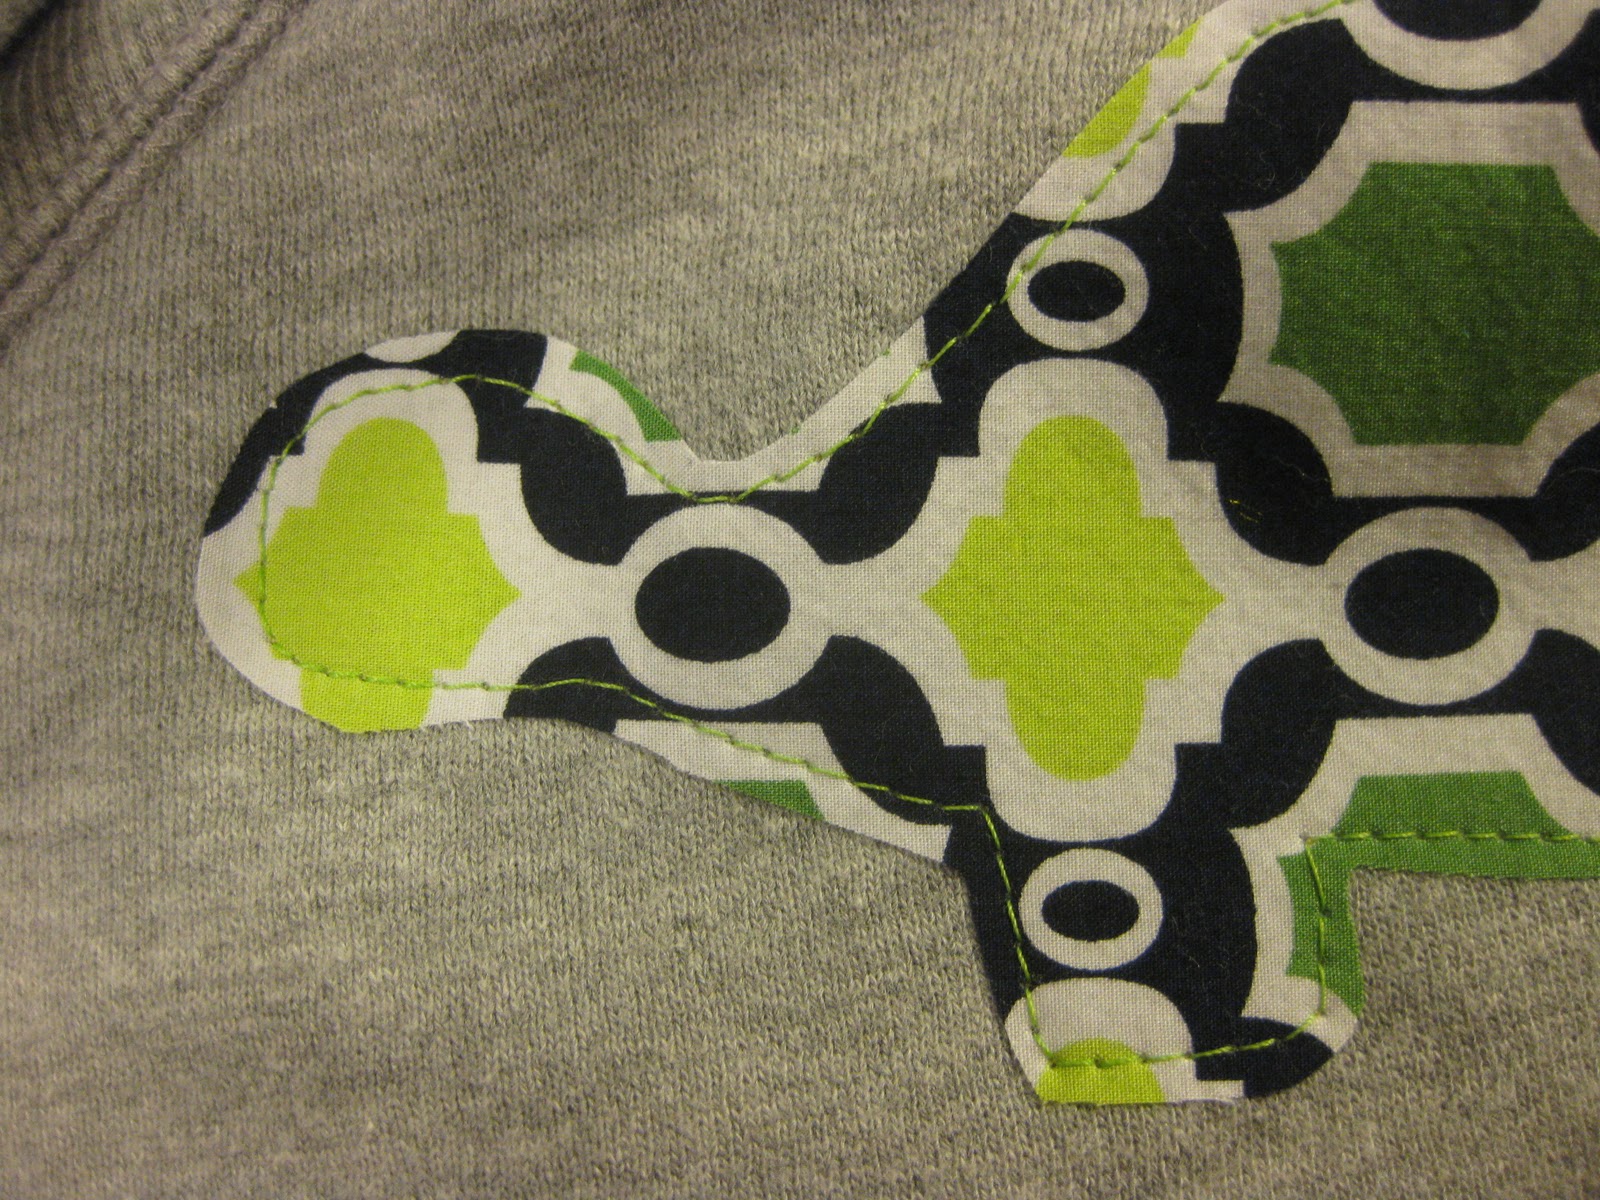
6) Now for the applique: Follow the directions on your package of heat n' bond and trace your dino and cut it out. Iron per instructions and then stick onto your shirt. Volia! Any questions feel free to contact me!


7) Take them outside to play! My little guy loves his new hoodie and was pretending to be a dino. Can't wait for him to be able to play on the playground once the snow melts!  


What do you think ? Did you like this tutorial? If so, please leave a 
little love by joining the sweet people to the left. 

Giveaway! 

Do you love the Sweet Stego Hoodie but want one premade for your little dinosaur ? Well today is your lucky day! Our giveaway prize is one custom made hoodie! Pretty awesome right? 

How to enter: 
1) Join the sweet people to the left and become a fan! ( 1entry) 
2) Become a fan of SweetHours on facebook (1 entry) 
3 Retweet this post on Twitter and leave a comment saying you did (1entry) 
4) Leave a comment on the blog ( 1 entry) 
5) Post about this tutorial on your blog ( 1 entry) please leave a link on our blog so we know where to go) 

5 Chances to WIN! 

*please leave your email in the comment so we know where to contact the winner 
( example: sweeterhours(at)gmail (dot) com ) 

A drawing will take place on Friday March 4th! 

Good luck! 

Linking to : 


mmm button

Making

The Girl Creative


The DIY Show Off

Thursday, February 24, 2011

Been a little busy this week. Not sure with what but nonetheless busy. I have a few things cooking in the creative kitchen that I will share shortly so don't worry!

I had the entire house to myself on Monday as I am between teaching sessions and Giraffe was at school. I felt I should do something nice for the person who is the rock in my life. He listens when no one else will, shares in my joys and sorrows and supports me beyond measure. He is a wonderful father and I love him. 

My husband like me loves a good mess.... 

We have an endless amount of things to fix and do to our home and like everyone else we have a ton of fix it stuff, tools etc. With my husband's schedule he can't really do work on the house at night so that leaves just Sundays ( as I usually teach Saturdays) The past few months his tools and fix it stuff has been a bit, well messy you could say... 

So, I did a little spruce up for him... 


I plan on making him a fix it space of his own soon and will chronicle the journey. 

Stay tuned for a VERY exciting tutorial tomorrow... 


Sunday, February 20, 2011

Homemade Butter and Sweet n' Sneaky Pudding

I had lofty craft goals for this long weekend but alas a cold has taken me down. I haven't been sick in so long that I honest to goodness thought I was having an allergic reaction to a cookie last night. Silly me. It came on so sudden and I had some difficulty breathing.  Thank goodness I didn't call 911. Whew!

In any case, I did have some dear friends over last night for dinner. At the last minute I decided to run to the store for salad fixings and decided to buy some heavy whipping cream for butter. Mind you, I have never made butter in my life but I have always been intrigued since seeing this. WOW. Homemade butter is MIND BLOWINGLY good.


Homemade Garlic & Herb Butter

2 cups heavy whipping cream 
1 1/2 tsp salt 
1tsp dried herbs ( I used Herbs to Provence) 
1 garlic clove ( I used two but I suggest one) 

Pour cream into food processor or food chopper and blend for 8 minutes. Add garlic clove and herbs and pulse again. Pour out excess liquid and blend again. Store in airtight container. 


My little Giraffe has a thing for chocolate pudding. While on a non-eating binge he refused to eat anything but pudding so, I had to become inventive. Cabot sells a wonderful vanilla greek yogurt that is so creamy you'd swear it was vanilla pudding and it has 18grams of protein! I often add chia seeds for added nutrients as they are a magical food. Super high in omegas, protein and fiber. We purchase ours from Navitas at Wholefoods. They are also great in muffins and other baked goods. 


Sweet & Sneaky Pudding 

1 cup Cabot Vanilla Greek Yogurt 
1 heaping tablespoon All Natural Kozy Shack Pudding 
Optional: 1/2 tsp chia seeds 

Combine together and serve! 


Linking to: 


mmm button

The Girl Creative

Thursday, February 17, 2011

Sweet Makes: Quick Cupcake Toppers

As I've gotten older I have had a really hard time buying things at the store. I do mean the regular store for our new readers, heck I could buy out the thrift store any day. Things in most stores just don't have enough character for me, thus I usually try and make things or buy second hand. 

The night before Giraffe's birthday I realized that I should probably send in some sort of goodies to celebrate the day. Out I went for organic cupcake mix. At the store I passed cupcake toppers of different sizes and styles and realized they just wouldn't do for my little one. So, I decided to make some... 

Quick Cupcake Toppers 


You'll need the following: 

- Large 1'' paper punch 
-Exacto Knife 
-Dot stickers
-Cork 
Toothpicks 
-Ink Pad 
-Inky Pen ( I love Japanese micro pens)
- Fun paper 

{NOTE:  Cork stamping is NOT a new idea. I have seen this technique featured on a number of sites ( who seem to claim its their idea) and in a few crafting books. Martha has a nice tutorial for clothes. So please, don't think I was this brilliant.} 


1) To begin draw out the design or letter you wish to use for your stamp. Try and keep it simple as you will be carving it later.  Then, while the ink is still wet place your cork on top to absorb some of the ink. After you have a basic outline on the cork draw it in a little darker. As you'll notice the design will be backwards on your stamp. Perfect! 


2) Begin carefully carving around the outline of the letter in small sections. It's a bit of a tedious process but well worth it. 

3) This is what your stamp should look like. It's ready for stamping! 


4) Test your stamp on scrap paper to see what color ink you would like to use. In the end I chose black because it showed up best on the polka dot paper. 


5) Stamp on the good paper and be sure to leave some space in between for the paper punch. I first chose green ink but then switched to green as it was more visible. 


6) After stamping, place the punch around your design or letter and punch away! 


7) Allow ink to fully dry. Flip over and place a toothpick in the middle then take a dot sticker and push down on the toothpick and paper. Easy right? Press firmly. ( You may rip the sticker a bit, no worries its on the back)  That's it! 


8) Enjoy! You could even use them for appetizers. 


**If you like this tutorial please do me a favor and join the Sweet People to the left ** Thanks! 


Linking to: 


giveaways


Beyond The Picket Fence


HouseofHepworths

Wednesday, February 16, 2011

Things I Can't Wait to Make...

I have a bookmark folder in Safari called, ' Things to Make.' I figured I share a little of
 what is in my brain: 

1) A Doll House for Giraffe. This one is from Darly Blog. So many beautiful details! Look at the beautiful papers on the walls!!! 


2) I vow to make a bag for the spring inspired by this beautiful Anthro bag. I think $198.00 is a an astronomical amount of money for a tote bag. Don't you ? 

3) Easter can't come soon enough! A little chalkboard paint can do anything! 


4) The simple slipcovers from In My Own Style would be a perfect way to freshen 
up my chairs this spring! 

5) Thinking about making a dino mobile for my kiddo's room... 
6) And last but not least... I just bought this pattern from Lil blue boo last week. 
SO excited about this shirt! 


Stay tuned, tomorrow I am releasing a tutorial
 on DIY cupcake toppers!